Saturday, December 27, 2014

Rise of Dagon: Dec 27 2014


This week I mainly focused on a process to create inventory armor icons for the players. I was able to previously purchase some weapon icons but I have as of yet not been able to get a good resource for the armor sets.

So I was able to work out a process that got a little faster as I went along which is really important if I'm going to create a bunch of icons by myself it can't take a really long time or the game will take too long!

So the chest armor took the longest being about two evenings to get it where I liked it.  The pants took a day. And then I was able to get the boots and gloves done in one day.

What I hope to do now that I've been through those pieces is to use the low poly version to sculpt additional armor variants very quickly speeding up the process even further.

I realize these are not incredible sculpt's that would look great in Thief game or something but they come out as armor icons very nicely.

Otherwise as time permitted I focused on some troubleshooting I had been putting off.  Previously I had to manually hit a 'load level' button once the main scene loaded ; given some of the changes I made this week now the level initializes on its own when you either start a new game or hit continue.

- Got automatic level loading in; previously you had to click a 'load level' in to the game once the game started
- You can now swap between different character inventories without having to go out of the inventory and back in
- added GUI "X" icon to close out inventory
- added supporting code for X icon to close out inventory

I also made some improvements to the inventory code to support swapping in between characters.

This next week I will probably work further on some armor icons and inventory code.

Thanks for reading, hope you had a nice holiday and a happy new year!

Saturday, December 20, 2014

The Rise of Dagon; Week of Dec 20, 2014

This week I got to enjoy sculpting in Mudbox on my new system.  I definitely noticed the difference.  Things seemed smoother and I was able to work with much higher sub-divisions without having any kind of performance issue.
Skull VDM I made in Mudbox

It was a little weird, previously I had to sub-divide until just before I noticed a performance problem and do my sculpting just below that level. 

Now with my new system I just subdivide to the level needed for the model and everything is much smoother.

So firstly I made a skull on a plane and then used it to make a template to do further carving with called a VDM.

So the VDM once made properly can then be used as a brush to scuplt with so I made this pillar that might be used on a wall panel as part of a decoration for architecture to add atmosphere.

I was really pleased with both how much easier it was to do the carving and then the use of the VDM was smoother/easier too!

Pill stamped with VDM skull
 I also did some further experimentation with a block and some painting in Mudbox to make this block of stone that has skull's embedded in it.


It looks pretty neat but practically speaking its not a prop I would be likely to be able to use in the game. 


Finally I spent some time further on the inventory system.  Now if you click on any of the character portraits to launch the inventory it will open it for that specific character and in the upper left it will show the characters Name, Character class, character race, and character level. At the moment I haven't implemented leveling so everyone is set to level 0 in case you were wondering why it shows this guy as level 0.


On the right side I made the inventory icons a little smaller to fit more inventory in a smaller area and then I used a test bit of code to randomly insert up to 50 1h or 2h weapons in to the inventory - or occasionally it will leave a blank spot.

I currently don't have any armor icons so I'm definitely going to need to work on that soon!

So that's it for this week.  For next week its Christmas holiday weekend in the United States where I am at - so I will probably either skip the update or do a very small one.

Thanks for reading!

Sunday, December 14, 2014

Rise of Dagon : Dec 13 2014 Update


Wow what a week!

Firstly if you had not already seen I participated in Ludum Dare 31 last weekend. I did the 48 hour competition version which means I had to make a game from scratch in 48 hours all by  myself.

I was really pleased at the theme "the entire game on one screen" and I was able to quickly and efficiently utilize Unity 4.6 to make the game idea I had planned on.

I really didn't hit any roadblocks in the process and the 4.6 Unity GUI went a long way (in my opinion) towards making this a really smooth process. I have been using the 4.6 GUI since it came out in beta so I don't blame you if haven't gotten up to speed on it yet; but I think most developers will find it reasonably easy to work with and suitable for many purposes.

I think it still has room to grow - but as a 1.0 version of the new GUI I'm very happy!

In other new I also found out last Friday (the 6th) that I was not going to get the house I was trying to buy and the people who had been selling it had a lien against them so they could not legally sell it.

So I ended up doing some house hunting on Saturday and Monday this week; and found a house I liked.  Then I ended up spending the rest of Monday evening filling out paperwork to put in an offer on the house.

In addition to all that the new parts for my PC I ordered from Newegg (two weeks ago!!!!) finally came in and I spent Friday night and this morning (Saturday the 13th) putting it together.

Everything went smoothly but it was a complete new system build as I have an old PC from about 5 years ago it was time to do a complete refresh!

So effectively I had about three evenings to work on the game; in which I did get a few things done!

Firstly I have expanded the players UI.  Particularly I have blocked out the area on the page for the player to have their personal attributes displayed when you hit the "i" button to go along with the inventory, character stats and the 'paper doll' to equip your armor.

Right now it looks a little bit too 'techno' (see screenshot at top of post) but I am still working on getting the first pass done and working from a programming standpoint- I'll polish the UI later.  Polishing before functionality is complete is often wasted time I have learned from previous experience.  (Yes, yes, I still can't help myself sometimes but I pat myself on the back when I can behave- and I'm doing that now!).

I also spent some time with Unity's 4.6 demo UI project where they have implemented a Draggable and a Dropable style script.

I learned quite a bit by doing so ; but at the same time their implementation stops short of being fully a drag & drop system.

In fact you can only drag in one direction!  And once you drop it; you can't drag it out.

The I combined the scripts in a new way to make what I thought would be a drag & drop script for any inventory slot - and it doesn't work!

So I read their all the code they have; and it all makes sense to me. I read it again; and it still made sense.

I assume something is intercepting one of my calls that I'm not aware of or something; but in any case from a 3-day productivity standpoint that's about all I had time for!

So this week I am settling in to my new PC and reinstalling programs, but I was careful to get Unity 3D , Photoshop, Visual Studio 2013 community edition all up and running first so I should be on track for continued development of The Rise of Dagon

Thanks for reading, see you next week!


Sunday, December 7, 2014

Death Police 3000 my Ludum Dare 31 entry is up


DEATH POLICE 3000 is a satire based on the current social issues in the USA ... shooting of unarmed civilians by our police force most frequently black males but also homeless and mentally ill men are targeted as well, and combined with the old movie Death Race 2000 where sport was made of killing people. 

WARNING: Features blood, killing innocent people including cartoon violence. 

Gameplay is very simple; attempt to underprivileged people while avoiding kill

ing privileged people. As long as you don't kill too many privileged people you will probably win! (AKA satirically the game is somewhat rigged like in real life) 

There is no way to die; just try to get the most kills you can in 30 seconds. 

If I had more time and was able to work more in to the game I would attempt to make a better challenge for the player than just a timer, some threats to avoid; perhaps try to kill people while not being filmed or to try and break iphones and cameras to destroy evidence and such but those were things I did not have time to get in! 

The satire comes in at the end depending on if you "win" or "lose" you get slightly different messaging about your actions. 

Thanks for playing, I hope you enjoy and please vote and leave feedback! 

NOTES/BUGS: 
- Made with Unity ; requires a browser that can run Unity web plugin and permission to do so 
- QUIT does nothing in web mode 
- there is nothing stopping you from running out of bounds of the screen at this time 


LD31 - Menus / Title

So my #LD31 is coming together with polish this afternoon.

I have gotten in a sound track and a couple of basic sounds.

I have also been working on all the menus - most of those are done except for the game over win/lose condition screens have to be polished with text / info.

So the title of my game is DEATH POLICE 3000 which is a satire based on the current social issues in the USA ... shooting of unarmed civilians by our police force most frequently black males but also homeless and mentally ill men are targeted as well, and combined with the old movie Death Race 2000 where sport was made of killing people.

Obviously in a limited time span of 48 hours I can't really go in to depth here so the satire is pretty blunt.


Saturday, December 6, 2014

LD31 core game loop in!

So it took a while, I had a really tough time making my bullet collisions work.

I am using manual movement (translate) my 2D sprites; and in Unity when you do that the normal physics collision boxes wont work.

I couldn't use their physics because I don't want all my sprites falling off the screen .. so I had to do a Physics.OverlapSphere  , which yes means I have a physics sphere instead of a 2D physics circle..

Whatever its a 48 hour challenge, hack away!

So now that the core loop is in its all about polish tomorrow!


LD31 NPC + Character movement in

I was able to get some basic player and NPC behavior scripts in and now the player can move, as well as the various NPC's move across the scene as intended!


Going to take a break for a bit; combat will be programmed in next!

LD31 - character sprites in

So I decided to go against the 3d objects I had as placeholders and did some quick character sprites (only one frame of animation right now but if time permits I can enhance that after I have core game play in)


Unintentionally they look a little bit south-parky to me, which I like. I may play that up a bit more if I'm able to spend more time on it later.

In any case now I'm ready to program in the core game play!

Friday, December 5, 2014

LD31 scene composed first pass

Okay so Ludum Dare 31 going well so far tonight!

I was able to create the basic player prefab, GUI layout, a level prefab, a enemy prefab, and a civilian prefab.  Here's a quick shot of how it all came together in the unity editor:


I did create the first C# file but I'm tired enough after a long day of work I'm going to stop here and get a good nights rest and work on the first pass of game play tomorrow. 

Signing out!

LD31 level texture in progress

I am designing with a retro-pixel style for this game to keep it ultra simple.

This is a work in progress of the 'level' texture for the game where the player will be at a cross roads in a city street area with a park in the upper left corner and some sort of shops or business areas in the other corners.


Using photoshop I've been able to get a nice 'pixel' effect very easily by doing some flat block out areas then:


  • apply noise filter (heavy)
  • apply Pixelate > Mosiac filter


 I'm using with a  size of 12 squares as I want the pixels to be fairly large for this.  Then I'll start tweaking some hand pixel touches here in a few minutes.

LD31 Idea + Tools + Laying out UI

Okay got my idea; circles around social justice issues current today. I haven't named it yet though.
 
Will be using some of these (maybe not all if I don't do any 3d then cut those out):
Photoshop
Unity 3D
Audacity
Figure
Blender 3D
Bxfr
Silo3D
MusicStudio

And maybe Substance 3D.

I started my new Unity project and have been laying out my UI for my idea.

Obviously not much going on yet but its nice how quick the UGUI can be put together!

It also looks decent enough I can probably use it for the final game unless I have extra time at the end to add UI polish .. but I doubt thats going to happen!

Rise of Dagon : Inventory System - Dec 6th 2014

This past week I updated to the new Beta 16 of Unity 5 and have been also house hunting.. despite that I got a really nice amount of work on the players inventory system for the Rise of Dagon!

So things are looking really good at the moment but I need to put the code together on the back end for this to all be useable .

This week I focused on the layout and trying to get it to scale right at different resolutions.

I also watched a few tutorials which were generally decent but I noticed that people don't seem to know about the ability to add Layout components to your UI.

On the left portion where the 'paper doll' slots for inventory is I have manually positioned the inventory slots; but on the right hand side the grid of actual inventory slots is done with a Unity Grid Layout component.

This is super handy; you do not have to spend a lot of time messing around with making things line up in code.  You add the component and put in a few parameters .. and bam! You have a working grid layout.

There is also a nice horizontal and vertical layout components; the menu bar at the bottom in the shown screenshot uses the horizontal layout!

Definitely check those out if you are using the new 4.6 unity GUI.

Other than that I will continue working on the inventory this week hopefully with the ability to drag & drop icons between slots this next week. I have never done that before so it may take a little work. .Its also not something in the new UI so I'll have to probably make my own IDragable interface or something to that effect.

As a side note I am at least tentatively going to do Ludum Dare 31

I should probably post a series of posts on my blog here and posts on the wordpress blog there as well as I go along.

Thanks for reading, see you next week!

Saturday, November 29, 2014

Rise of Dagon : Nov 29th 2014


As promised after a week break I have returned with an update.

I was hoping to have been moved the previous week but unfortunately the place I was going to was not ready yet. So that is still at some point in the future for me.

One of the big things that happened was the Unity 5 beta 14 release.  I updated to this release and it made a gigantic difference on the look of the levels to the point where everything looked like it was made out of super-shiny metal!

So I had to refactor a lot of the shader settings and found that they had swapped the default Unity 5 material from 'specular' model to 'metallic' model.

I believe they also massively ramped up the specular levels of everything in general. So you'll find that the screenshots look different due to tweaks I made; however I can't say this is the final look & feel because I expect things to change again as the beta isn't over yet!

Unity 5 Beta aside I've been focusing on some polishing to the core game loop.

The core game loop is in .. in case I hadn't said that before!

So the core game loop being in is great but it was missing a little bit of polish that made some of those things not so easy to see to the player.  For instance if a player had died, the only way for you to know that previously was the red health bar looked 'empty'  , which it could also look pretty darn empty if you had only 1 health left for example.

So I now have a skull replace the player portrait when they are dead to let you actually know that particular character is dead.

Also there are now damage blood splashes on the character portraits, with the amount of damage you have received

Over the next week I plan to add more polishing bits as I mentioned above that provide feedback about what is going on to the player and improve the game play in general.

So now I'm going to be tightening the core game play loop and try to get game play to that really tight and fun spot that it needs to be at.  This is a really exciting point to be at for the project, but there's still lots of work to do that is not part of the core game loop.

So for the past two weeks we have the changelist:
  • first pass character portraits added to GUI
  • animated damage splash on character portraits
  • animated damage number indicator on character portraits
  • monsters now face player when attacking at all angles
  • migrated from legacy animation to mechanim system
  • added monster attack animations
  • added monster death animations
  • added monster miss animations
  • end game condition for party death added
  • skull portrait for dead character condition added
  • end game condition for party victory added
  • first pass end game menu added
Thanks for reading, see you next week.


Saturday, November 15, 2014

Rise of Dagon: Week of Nov 15, 2014

This week was a little low on productivity because Visual Studio 2013 Community Edition came out.

This was a really exciting development for me (and a lot of developers) so naturally I rushed out to download it the first night.

It ended up taking the full night to get installed and slowed my machine down a lot so I didn't get much done.

The next evening when I launched it said it was VS 2013 Express  .. which I though I had removed but I guess not?

So I had to remove that which took most of that evening, and then finally the next evening I reinstalled 2013 Community edition and now it is working properly.

So I thought I was set at that point but then I started experiencing Unity Editor crashes pretty frequently - which was not happening before.

So I swapped back to Monodevelop and the crashes are still happening.  So I started saving every 5 minutes .. which didn't work .. I actually had to make a change, quit Unity, and then load Unity to get anything to save.

Needless to say this was frustrating and very hard to be productive while this was going on.

In any case I persisted and got a few minor things done.

The first thing is I made some small improvements to my level loading code. I had previously implemented this loading with a fairly quick hack and found that it was not loading pillars that were not connected to walls so I went ahead and fixed that.

So the screenshot featured at the top shows a little section of room with freestanding pillars that I made to test that code fix.

Next up I was able to do a bit of work on some of the specular materials.. in Unity 5 beta I am using the new PBR default shader and I've found that something in the specular maps is causing some 'sparkly' artifacts to occur.

I was able to resolve this largely by going through the specular maps and using the Photoshop levels filter and make the whole thing darker by about 70%.

Then as needed in particular areas I did a select by color range and toned down other overly bright areas even further.

The takeaway I'm getting is that specular maps need to be much darker in general to look right in Unity 5 PBR mode!

Finally I was able to get some player targeting code done where I am able to find out which monster(s) are standing directly in front of the player so that when they press their default attack it will target whatever is in front of them.

This actually was tricky as I was using a physics collider box but it turns out (at least this is what I think) that I couldn't use the colliders when I a manually transforming the object around rather than letting physics do it.

I was able to figure this out eventually by reading the docs and swapped to a Physics.OverlapSphere as shown on the Unity docs and this did the trick!

So that was it for this week.

As an advance notice I am moving next Saturday so I will be skipping the update in favor of doing it the following week of Nov 29.

Thanks for reading, see you in two weeks!

Saturday, November 8, 2014

The Rise of Dagon : Nov 8, 2014 Update

As mentioned last week I was in the middle of evaluating the viability of swapping the project over to Unity 5.0 beta but hadn't quite finished. The question was is: beta was stable enough to allow me to move the project over, or was there some sort of blocker or bug that would break the project?  At this point I've finished and feel satisfied I can go ahead and fully swap over to Unity 5 from this point forward as nothing severe enough to stop the migration was found.


This will make things much simpler as it has always been my goal to utilize the PBR (physically based rendering) approach for the materials.  Being able to cut over to the target approach as early as possible is very desirable as you can imagine.

Code-wise I was able to work on the first pass of path-finding for the monsters. They are now able to navigate through the dungeon on their own making turns down paths, or alternating routes as needed. 

I was also able to get a first pass on line of sight check for the monsters which should enable me to have the monsters seek the player out once they see him.  So that's my goal for this next week!

I've also been working on some additional environment models and art , one of which shows up briefly in the video -- there is a portcullis gate that the skeleton walks through at the end of the video because I haven't put in the code for doors yet! :)

That's it for this week, see you next!

Saturday, November 1, 2014

The Rise of Dagon: Unity 5.0 Beta - Week of Nov 1st

This week was really exciting because the Unity 5.0 Pre-order beta came out!

I spent most of the week converting the project over to Unity 5 beta and testing out if anything had gotten broken and converting materials over to the new Unity 5 default material.


So I made a comparison screenshot (seen above) for your review.

On first past you might not actually notice the difference except for one notable thing and that is the portcullis gate that I was working on can barely be seen on the right scene..

However if you look closely at the ceiling in both pictures you'll notice that they actually look pretty different when it comes to down to it.

The ceiling on the left is very  'sharp' and 'flat' looking with a lot of 'shine' where the light catches it. It almost looks like  newer polished stone? Which is a bit odd for a dungeon right?

 While the ceiling on the right looks more like old stone with dull shine .. more like a cobblestone rock would actually have.  This look is the look I was going for when I made the ceiling so I'm happier with it. The thing is in neither case did I spend much time tweaking it -- I used the default shader in 4.x and 5.x.   I'm still very much in early phases of production and don't want to spend a lot of time tweaking the way things look -- which is one reason I wanted Unity 5 - its PBR (Physically Based Rendering) pipeline was likely to pay off and look more like the way I wanted without a lot of work to tweak the materials manually.

So back to the portcullis.  I agree its much easier to see the one on the left but for a rusted metal its far too shiny!  It looks almost liked a polished metal in Unity 4 and it should look very dull and dark -- like it does on the right.

In the end I might need to adjust my lighting levels up a little bit but as I understand there are still some lighting features they haven't finished yet so I'm tempted to not spend a lot of time tweaking it right now.

There are other more subtle differences.  If you look at the very far right of the image you'll see the stone's there look chiseled and sharp .  Most particularly where the cracks are.  But if you loo to the same area on the left image .. sure the cracks are there but they are missing the highlights that give it that extra edge.  There are a lot of small things like that in the visual area that I like about the new lighting model as well.


Code wise this week I didn't do a lot of work so I am going to roll that discussion in to next week's update.

I will continue to do further testing in Unity 5 to make sure its safe to cut over to this for my project before I make a commitment. I need to vet that everything I've worked on so far either continues to work or can be fixed.  Things look really promising for swapping over to Unity 5 and I should be able to make a call on it in the next few days whether its a go or not.

I'll update you on progress for Unity 5 change over next week, see you then!


Saturday, October 25, 2014

Rise of Dagon Development Update October 25, 2014


This week I  worked on some tasks that help bring things together in a bit of polish and some various steps towards getting the core game play one step further towards being implemented.

One of the polishing steps was to work on the way the player moves, including the smooth turning to the left and right which really enhances the feel of navigating through the dungeon as you move and looks really nice.

One of the steps moving closer to core game play is I have put in a test monster spawner that will spawn 3 skeletons in any level that I create in random empty spots in the dungeon.

The point of this is I want to test out their ability to move throughout the dungeon, and then test their ability to see the player if they are in 'line of sight' and then furthermore seek the player out (navigate to them) if they can indeed see them.


I also have been working for several weeks on attempting to create character portraits.  I have used  Art Rage 4, Adobe Photoshop, and finally I started using Mudbox and I think with Mudbox I am finally getting close to satisfactory results.


First I have a Dwarf who is looking pretty solid (but not finished of course). You'll notice he is missing any kind of clothes and armor but his face, beard, and color tones are all fairly decent. I would like a slightly more polished look in the end but this is a really nice effort at this point!


Next  I have also been working on an Elf who is not as far along as the Dwarf but this sort of shows how the carving phase looks before I start putting on hair and painting the model more. It's a little hard to tell because the dwarf has a beard but the elf has higher cheek bones, a more pointed chin, a thinner nose and of course the pointed ears are easy to spot!


 He does look a bit creepy with no hair but I will be working on that soon!
 With the continued use of Mudbox I have been getting better at it and have started to try and use it to take models from Silo 3D and start figuring out a workflow and pipeline for asset creation.  This Dungeon Door took me about two evenings of work to get to the state you see it in here.  I would definitely like it to have more detail but again its such a nice quality level as is that I'm really  happy to be able to hit this type of quality with the tools I have. It makes me feel really optimistic about the look and feel of the game that I will be able to create!


The changelist is a little light this week mainly because it was a split week between art and code.

Changelist:
- created a test method for spawning 3 enemies in random places in the currently loaded level
- refactored some movement code from MoveActor into PlayerMovement to fix some movement bugs
- found another bug in movement code that I wasn't aware of previously and fixed it (after moving in to a wall sometimes you could not move again)
- created new methods to apply SLERP to player turning LEFT/RIGHT
- created new monster interface class IMonsterMove to handle the AI for monster movement

And that's all for this week I hope you enjoyed reading, see you next week!

Saturday, October 18, 2014

The Rise of Dagon: October 18 2014 update

I was able to hit a really huge milestone for the Rise of Dagon this past two weeks : Level Saving & Loading is in!


This was a big deal for more than one reason and there's a lot to talk about so I decided to do a 5 minute video to cover all the reasons and what happened the last two weeks for this update.


Thanks for watching, see you next week!

Saturday, October 4, 2014

The Rise of Dagon : October 4th update.

So this week started off a bit rough, I was able to complete what I thought was going to be a week long goal the first night.

I know you are saying to yourself "how is that rough?!"

We'll that means I did a bad job estimating how difficult the task was for one thing.  Secondly it means that I hadn't thought out the next item fully and wasn't prepared for it yet. That item was in fact part of last weeks update.

So Saturday afternoon and Sunday ended up being a bit of a wash from the standpoint of getting my head back on track.  I took the opportunity to relax a bit and enjoy my weekend and played a bit of Terraria with my son which was a lot of fun.

And then Sunday afternoon I had my thoughts together and sat down to program and I kid you not - just as I did so I got an email from Netflix saying that the Walking Dead Season 4 was available!

Now this was just bad news. I really try to avoid getting wrapped up in entertainment when I'm trying to program but I love this show so I decided that I would try to do a 50/50 approach. I have been doing programming for half the night and art for half the night while I watch The Walking Dead.

This worked out okay though as I needed to get some work on concept art for character portraits done.

I have Adobe Photoshop and Illustrator but I have been hoping to use Art Rage 4 as I really appreciate its natural brush feel it has.  But I was really unsure of what I can actually achieve with it so this week was a experiment in that direction.

While I did do a small set of test portraits I won't be showing them off today as I think they all need more work before sharing.

So here's a quick video showing off the level editor work that I did this week:


Changelist:

- Created new Carve class to specifically handle level editing
- Refactored all carving items out of EditorInputHandler and placed them into the Carve class. This was a big job as there were over 1000 lines of code that had to be separated in to the two classes!
- created new methods in the Carver class to delete child objects when using the Edit Square inspector panel to remove elements (walls, pillars, etc)
- did some further optimization/refactor of methods in the Editor Input handler that could be simpler due to functionality moved to Carver class
- added new class CarveBrush which will be used to make customizable carve brushes
- refactored the Carve method in Carver to use logic according to which brush you have currently selected
- added new Custom 1, Custom 2, Custom 3 carve brushes to the UI
- added new "Apply" button in the brush inspector panel, this allows you to apply the pattern in the square editor inspector panel to the currently selected brush
- added UI for toggle between "Smart" carve and "Strict" carve
- added new logic for Strict carving in the Carver class Carve method
- added new logic for Smart carving in the Carver class Carve method
- adjusted material on solid blocks for the dungeon to be a flat black material; makes it easier to see the dungeon you are carving
- adjusted the lighting used in the editor to give a bit more atmosphere and shadow to the tiles

Thanks for reading, see you next week!

Saturday, September 27, 2014

The Rise of Dagon Week of Sept 27th

EDIT: I originally posted this with the wrong date. Title has been updated for correct date.

Well its been another very nice and productive week for working on the level editor for the Rise of Dagon.  These improvements start implementing the ability to configure the makeup of the architecture of the level rather than just carving out the halls and rooms.

For the most part this looks very similar so I've made a comparison image with a detail zoom in to show it a bit better:


You would actually notice a huge difference if you were in first person in the dungeon of course but as this is editor work I wanted to show it off like it looks in the editor.

Change List for the week:
- added greater scroll range to editor camera
- coded in "EDIT" tool to enum for ActiveTool
- added icon for edit tool
- created three new graphical 'tabs' for the editor tools
- created code to update text on screen to let player know what tool they have selected at the moment
- created new GUI element for the edit tool where you can set edit individual properties of a dungeon square
- created new toggle boxes for each GUI element for the edit square gui
- created a new class "EditSquareAction" that  receives the messages sent by the togglers
- created public members for each of the buttons and togglers in the edit square GUI in EditSquareAction
- created public methods for each of the Togglers
- created if statements that mark the buttons interactable/non-interactable depending on toggler state for each of the togglers on the edit square GUI
- added level logic to the EditorInputHandler.  Previously it was just throwing down blocks.  Now it will build logic attached to those blocks
- added new method to set solid block logic
- added new code to carve tool to set the block to a carved logic state (passable by the player, etc)
- added new SelectionSquare class to track the current selected and previous selected square (because apparently structs are a bitch to work with in C#/Unity)
- added methods for the EditorInputHandler for pillar instantiation
- added methods for EditorInputHandler for wall instantiation
- added code to prevent 'click-through' on UI elements vs level square grids as this was causing problems
- added methods to the EditSquareAction to reset the square when you change from editing one square to a different square by reading the logic array
- added a new boolean that tells the UI not to fire the Toggler actions while I am changing the square in code ; as the UI was firing as if someone was pressing it. Its unclear if this is intended or not but was an easy work around.

This work will continue over the next  couple of weeks at least and probably a bit longer as this is where much of the game detail and even eventually the logic around keys, triggers, quests will need to be added as well.

Thanks for reading!

Tuesday, September 16, 2014

Rise of Dagon : Week of Sept 20, 2014

This week was my CAKE DAY!  Good times indeed.

I did short 5 minute video with commentary on the upates for the editor and Substance Painter quick demo this week you can watch on Youtube here:

For my birthday I was able to budget out an upgrade to Unity Pro 5.0 !  This was huge for me - I really want to use the PBR (Physically Based Rendering) feature for The Rise of Dagon and budgeting this out was a major goal for me. I'm really hyped that I will be able to use this more advanced shading/lighting model for this game!


First I'll go over the changelog , then I'll discuss what some of those line items mean and then finally I want to discuss Mudbox 2015.

Level Editor shaping up nicely!

ChangeLog Week of Sept 20:
  • added new EditorMouse class
  • added mouse wheel zooming  EditorMouse class
  • added right click panning to  EditorMouse class 
  • created new OverlayAction class
  • added new 'overlay' quad primitive and gameobject , which uses OverlayAction
  • Added methods to OverlayAction that help track what dungeon grid/square you are referring to when you click on it
  • wired in the "NEW" Button to instantiate a level that is as big as your level sliders have been set to, currently supporting levels that are up to 3 layers deep, and 50x50 squares wide, and tall accordingly.
  • added HitReceived method/listener in the EditorInputHandler that receives hit info from OverlayActions
  • Added tool detection methods to HitReceived and branching decisions on what to do based on current tool
  • Implemented first two methods for level editing "carve" and "solid block" so you can now carve out areas of a level, and you can fill them back in with solid rock.
  • Added GUI toggle boxes for choosing which layer of the level you want to view/edidt
  • Added SetLevelView method that toggle boxes call, setting the selected level layer active, and the others inactive

So this work is largely control based for navigating around and making selections in the level editor. This work was needed to lay the foundation for actually editing the dungeon itself which is up for the first pass of work next week.

New Skulls in a Scene


Next I wanted to talk about Mudbox 2015. 

I have been really working hard to use Blender 3D for my sculpting tool but the longer I use it the more I realise while it is technically capable; its really not as smooth and productive for me as either ZBrush or Mudbox could be.  I don't want to make this about tearing down Blender 3D as I do in fact use it for many things and appreciate the free software, its actually great for a lot of things! I do all of my animation in Blender 3D.

I have used both ZBrush and  Mudbox on student licenses in the past so I'm familiar with them, but I can't use a student license to produce my commercial game!

So ZBrush was my #1 choice , but its very pricey at essentially $800 US dollars.  

The last time I checked Mudbox was also about $800 US dollars, and while I do think its a very competent product - lets be honest ZBrush is a pretty clear leader in the industry
Skull in Mudbox

Skull painted in Substance Painter


and if your going to be paying the same price then which are you going to pick? 

However since I had been able to afford Unity Pro I set my next goal of attempting to finance ZBrush, but in doing so I did a round of research for pricing just to make sure that there was no "indie" pricing or leasing options available and much to my surprise Autodesk now offers Mudbox 2015 subscription at a monthly rate of $10.00 a month!

That adds up to $120.00 a year, and they typically update their products once a year. This means for about 1/7th of the price of the stand alone product  I can stay perpetually up to date! 

Needless to say I double checked ZBrush did not have a similar deal (they do not) and I plunked down my $10.00 a month right away!  

Saturday, September 13, 2014

The Rise of Dagon : Week of Sept 13 2014

This week was largely focused on the very first passes of the level editor for the game. However I did create one new piece of art which is the ever present dungeon wall "with shelf" to place and retrieve those all important quest items upon!


As you can see in the above shot the shelf is on the right hand side, a little hard to see in the lighting but I do prefer dark/ominous lighting for dungeon crawls as it really adds atmosphere!  Certainly as a player you will have different forms of lighting that you can adjust that with such as torches or light spells but this is roughly how it would look with only the wall torch nearby.


So I'm going to forgo the changelist this week because much of the changes were not code related but instead exploratory UI building tasks.

I am still very much trying to find all the right elements and a simple elegant style to editing the levels.

I would like to have some power in editing, yet an over arching simplicity.  The screenshot below show's off the state of the editor UI today.


In the bottom right hand corner will eventually be a preview window rendering the players perspective from the selected square but its just a black square at the moment.

I'm sure that I'm not satisfied yet. I sort of added things I needed to get the first pass of things going such as the slider bars that show the X, Y and Z of the level.  If we set those values to something like 10/10/3 we would get a level that looks something like the one shown in the shot below.


Then you would begin carving out hallways in each level depending on the layout you wanted.

You may notice if you look closely a small transparent layer above the red level blocks -- that is actually a transparent UI layer to help select the grid member you are working with rather than part of the level.

My current idea after a week of exploratory design is I want the flow to be something like this:

  • Choose your levels size
  • Select the layer you would to begin editing
  • Carve out your halls ways and rooms with a carve tool
  • Place major items like doors, arches, pillars, connecting walls, stair ways etc
  • Place Monsters (potentially with some path editor for patrols)
  • Place decorative items like cobwebs, debris, skeletons etc.


What you don't see in that list is where / how you would add things like quest items, monsters, loot, and game logic like "this door requires the gold key with id 437"

I'm picturing while editing and placing items that they would have meta data style properties to add these things in. But I would also really like the editor to be super smart and have a warning list that tells you "hey you put in a door that requires key 437, but you have not placed a key 437 in the game yet!"

There's really a ton of work left both in the interface of the level editor itself as well as the logic it needs to help you build a level!  I expect to be working on this for the next several weeks!

Thanks for reading!


Saturday, September 6, 2014

The Rise of Dagon : Week of Sept 6th

This was a really great week for The Rise of Dagon development!  I hit a very nice milestone where you can start a game, create a new 4 character party and then hit the Play button and load the first level with your newly created party!

This work was all made possible by the recent release of the Unity 4.6 Beta including the new Unity GUI update. I have been holding off work in that area attempting to 'work around the edges' of things needing GUI interaction.  So after making the base screens the previous week I tackled actually adding the functionality to the entire sequence of screens. I had never worked with the programming end of new Unity GUI so it was really big question of how
difficult this was going to be and how far could I get in a week?

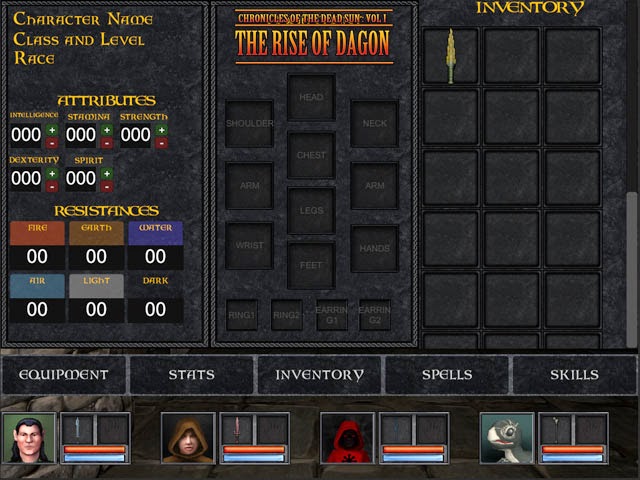
The character creation screens have a baseline functionality on them so they will be improved over time both to look better (including portraits!) as well as to provide additional features such as gender selection, attribute allocation, and potentially starting special skill/ability selection.

Changelist:
- created new CharCreateController class to control the Character Creation scene
- added  several enums for creation process
- added  created variables for each character slot to control race, class, first name, last name, full name
- created function to create a new character
- created function to clear an existing character
- created function edit an existing character
-  created function to set race
- created function to set class
- created function to set name values
- created several helper functions as the Unity GUI (hereafter uGUI) does not support custom types so I made helper functions that convert an int to a character class for instance
- added uGUI Text to party creation screen for the character name to show up per slot
- added uGUI Text to party creation screen for the character class to show up per slot
- added uGUI Text to party creation screens to show base attributes for the current char
- wired in all the above functions and tested
- found a few bugs and fixed them right away, most notably name creation was keeping the old characters name when the next character was being created
- created new SavePartyToPrefs class to save newly created party temporarily to playerprefs for new game
- created LoadPartyFromPrefs class to load newly created party in the first level
- added new methods to PlayerBehavior to instantiate the proper classes loaded from LoadPartyFromPrefs class
- improved first name and surname entry fields to clear the text inside them as soon as you click in them for easier character naming
- refactored some code from the character creation class in to a new ClassDescriptions class to handle the part of character creation than handles updating the uGUI fields for the class you are previewing
- refactored some code from the character creation class in to a new SummaryInfo class that handles the final summary screen of the character you are creating
- removed the GUI button to edit a character, I still may support this but the work to do it will take a while and was not essential at this time


In addition to the items above I also spent a pretty large chunk of time tweaking the uGUI interface elements to make sure they scale properly.  There are quite a few different options available for each element and depending on how you nest things it takes a bit of adjusting to get things to look and scale right as screen resolution or aspect ratio's change.

As seen in the screen shot the 'red x' patterns show UI elements that are not scaling well when you resize things around it. Lots of small adjustments are needed to get things right.  It's not horribly difficult and I suspect over time I'll understand the system better so I make better choices initially but for right now it does consume time trying to get things adjusted.

That's it for this week, thanks for reading!

Saturday, August 30, 2014

The Rise of Dagon: new Unity GUI Screens - Week of August 30th 2014

This week's update is beginning to show the fruits of the new Unity UI release; I have been able to take a first pass at the new Main Menu for the game and the  Party / Character creation menus.

These items haven't been coded in yet to do what they need to do


Changelist:

- Created new "Main Menu" scene
- Created new "Create Character" scene
- created enum in BaseCharacter class for CharacterRace
- added first six races to the character race enum
- created first pass main menu using new uGUI
- created script for main menu for each of the buttons to take you to the appropriate scenes (note only implemented the ones that exist so far)
- created first pass layout for the Character Class selection using uGUI
- created first pass layout for Character Race selection using uGUI
- created first pass layout for Party Creation using uGUI
- created first pass layout for Character Naming and Portrait selection using uGUI
- created first pass layout for Character Summary and confirmation using uGUI
- fixed a player movement bug that was created from the refactoring of the player movement in to its new PlayerMovement class

In the screenshot below we have the race selection screen, where you can see by the placeholder text once the player selects the potential race they will receive more information about that selection before deciding.  


Next up we have the class selection screen, similar to race selection previewing a class by selecting it will eventually give you more information about that class.

At this time I've put in four 'core' RPG classes but I definitely will be adding more classes; I might utilize classes to put in the game as a kickstarter or indiegogo campaign - but that will be a little ways out before I decide how to approach that.


Next up we have a screen to name and configure your character portrait.  The portrait area is using the new scrollable rectangle element in the Unity 4.6 GUI and works really nicely.


And finally we have what will be the final character creation screen where you review your character abilities and skills(and potentially assign out extra  points) before finishing and saving the character:


So obviously these are using placeholder graphics but they still look fairly nice for what they are.  By putting in some of the game set pieces in the background it actually presents as a fairly solid looking UI. I can definitely see people being able to use the Unity UI to pretty good effect without too extensive of effort needed.

I did encounter some difficulties with the UI though.  There were times when it does not scale properly, or it will flip the graphics (showing as a red X).  Its not clear to me yet if this is a bug or if I'm just doing something wrong when it happens.  Typically when scaling it too much in just one directoin is when it happens, but there are occaisons that it would happen when just changing to a different aspect ratio or screen resolution.

For the most part I was able to design around that -- which leads me to believe that perhaps the issue is just a learning curve rather than a bug?

I did however have one thing occur I feel that really must be a bug which is while in the unity editor you often have a small window for a game preview which is supposed to look as much like the actually game will look when you press 'play' as possible.  There are always a few things that don't always render though like particles won't play unless they are selected and lighting and shadow effects largely don't show in the preview window either.

So what happens is say you selected 1024x768 as the target size , but because of your window layout the window is actually scaled down to something like 512x  the UI will not scale properly until you either undock the gameplay preview window or put it in its own tab so that the preview can match the desired target size.

Once I realized what was happening I was able to work around it easily enough - but until I figured it out I was having quite the hard time figuring out what was going on!

That's it for this week, thanks for reading!

Saturday, August 23, 2014

The Rise of Dagon: Week of August 23 2014

Greetings!

Unless you've been either sleeping under a rock OR you aren't currently using Unity 3D you already know that the Unity 4.6 beta was released this last Wednesday.

The big feature in 4.6 is the new Unity GUI update that has been coming for about 2+ years?  I know it was scrapped and restarted at least twice, and the NGUI developer was hired for one of those re-writes and then left .. which publicly was very unclear if this meant things were in a horrible state or being just a philosophy disagreement?

It was very difficult process as a member of the public waiting for the new UI but finally it has arrived!

So I've been thinking about changing the format of this dev update a tiny bit - and that is to try and include a 'changelog' list of items I've worked on.

Many times I pick and choose what to write about but I may have actually done a lot of other work that isn't glamorous or screenshot worthy -- but was still work towards the project goals.

So for the near future until I decide that I like or dislike the format I'll be include a changelog list such as the first one we have here today.

This weeks changes:

  • Refactored PlayerBehavior class to remove the player movement related code in to new class PlayerMovement
  • Created BaseMonster class which inherits from the same BaseEntity class that the player characters do
  • Created AMeleeEnemy class which inherits from BaseMonster
  • Created new interfaces  IMeleeBehavior, ISpellCasterBehavior
  • AMeleeEnemy class now implements the IMeleeBehavior interface
  • Created new IGo interface used by the EnemyManager class to tell the monster to take its turn
  • Created new SkeletalFootman class for the very first complete monster class
  • SkeletalFootman now implements the IGo interface 
  • The SkeletalFootman creates a new instance of the AMeleeEnemy class to implement its character class and combat behaviors and interfaces
  • Worked on EnemyManager so that it now can spawn multiple enemies and control a generic C# style List of enemies. 
  • Recreated player portrait in uGUI
  • Recreated player hotbar in uGUI
  • Recreated player healthbar in uGUI
  • Recreated player manabar in uGUI
  • Resized sprites for new GUI (was too big)
  • Made it so player GUI bars should resize to any reasonable desktop screen size and orientations ; only thing it doesn't handle is small resolution portrait mode resolutions (mostly only found on mobile devices)

And that's all I can remember; unfortunately I decided to make this list at the end of the week instead of keeping track from the beginning so it may be missing a few items!

I should mention this week was a bit of a blockbuster for productivity - I was on a real roll! I do not always get this much work done so please don't expect a changelist that big every week!

And so we have a short video showing off the EnemyManager telling the skeletons to move forward each time the player moves.


It is just hard coded to have them move forward for now; I still need to do pathfinding an AI in a future update.

Thanks for reading, see you next week.

Sunday, August 17, 2014

The Rise of Dagon: Week of August 16th 2014

So last week I had finally gotten my level logic tied in to the game but wasn't quite sure what to do next.

Sometimes there's a gigantic list of things you know you need to do, and an even bigger list of things that you aren't even sure of yet but you know are lurking out there somewhere just waiting to spring up and surprise you right when you thought you were going to actually get something done!

Thankfully this week that didn't happen and I was able to pick something to do, and actually do it!

What I chose to do was to work on the game 'state machine'.   As I'm unclear who may be reading and what your knowledge level of game programming is I'll explain that just a little bit.

A 'state machine' is the area of the program that handles what goes on in the game. 

Is it the players turn? Is it the monsters turn? Should the game spend a few milliseconds updating the game world and checking for any special events?  

Quickly swapping between these things and deciding what's to be done next is the state machine's job.

It's not actually a terribly difficult thing to create but it is easy to do things that cause your game to slow down and run poorly if they spend too much time in any one part of the state machine for too long.

Imagine if the calculations of determine what move the monsters are going to take took several seconds?  Well then you would have to wait several seconds between each turn!

Previously I demonstrated combat between the player and one monster.  This was a basic two state machine handling the logic for that sequence.

Now I have increased that to the following states:

START,
GAMEUPDATES,
PLAYERTURN,
MONSTERTURN,
WIN,
LOSE,
PAUSED

I'm not actually sure I will use all of these states but its better to have them available rather than try to squeeze to many things in to the wrong areas.

The "LOSE" state will clearly be needed -- this is when all your character are dead and the game is about to end. If I want to disable player control but let the game state continue for a moment and say have the monster do some sort of cheer over your body then this is where I will do that - and then transition to the game over / load game screen right?

The "WIN" state could be where I handle handing out XP and playing audio events after you've defeated an opponent. It might also be that could be handled during the PLAYERTURN or GAMEUPDATES so WIN might go away if it doesn't work out :)

As I noted before this wasn't too difficult and went in smoothly.

At that point I still had a nice chunk of the week left and decided to start moving forward with the next bit of the state machine progress and move the MONSTERTURN in to a more formalized system that handles the logic for all the monsters instead of just one.

This actually caused me a lot of pain and I want to share why & what happened , this could potentially save someone else a nice chunk of time and pain if they run in to it!

So keep in mind I'm using C# and Unity 3D here.. if you are using other languages this might not be an issue.

Firstly I made a EnemyManager script. The EnemyManager is what does all the work during the MONSTERTURN ; when it is finally done it will tell the game state machine it is done and the next state will proceed.

So firstly I decided to get my single skeleton monster in to this Enemy Manager and let him do what he had previously done .. sure no problem just a little bit of research here.

I decided to go with a Generic C#  List  See MSDN here.

So what I did was  in my EnemyManager class declare :

private List<Monster> monsters = new List<Monster>();

Then later after creating the monster in the scene I used Unity 3D's "FindObjectOfType" to add it to the list like so:

monsters.Add(FindObjectOfType(typeof(Monsters));

This worked great, and I had my one skeleton added to a list and was then able to reference the script in that list and call it from the MonsterManager!

But then I wanted more than one monster in my scene  .. and did this

monsters.Add(FindObjectsOfType(typeof(Monsters));

Notice the bolded and underlined s in FindObjectsOfType ..   and all of a sudden errors are coming up left and right!

So I spent the next couple of days trying to figure out what I was doing wrong.  It did not help one bit that Monodevelop did not detect any errors, but when swapping in to Unity 3D it would give anywhere from 1-3 different errors depending on how I tried to change or fix it.

To make a long story short the problem was this :  it was not returning the system.generic.collection List type!  I believe it was returning Unity 3D's ArrayList!  But this wasn't abundantly clear in the documentation because   from the Unity documentation here you'll see it just says it returns a list (near the top).

Once I understood Unity's FindObjectsOfType was not returning the type of list I wanted it was easy enough to fix.

I was doing this while instantiating new prefabs anyways so I simply add them when I create them by doing this now:

monsters.Add(prefabname.GetComponent<Monster>());

The funny thing is , I decided to use the FindObjectsOfType because I wanted to learn the Unity API better -- and I guess I got what I wanted - just not in the way that I expected!


Thanks for reading, see you next week!